Hi! It's my stop today on the Westwood Acres Liberty of London Blog Hop! Amanda asked if I'd like to come up with a project idea using the beautiful Liberty of London tana lawn fabric, and I, of course, said yes! Who wouldn't?!
Westwood Acres has a Liberty of London Club where they curate 10 piece bundles of Tana Lawn each month for a year. Click the link for more info on the club and build your Liberty of London stash!
I've never worked with lawn before, but having worked at quilt shops for the past five years or so, you tend to learn how to teach people about things you have little experience with. So I knew you should use a smaller, sharper needle with tana lawn because of the weave. A 70 microtex sharp needle was my weapon of choice, and it worked beautifully. Although honestly, working with the lawn was a dream... it's more delicate, yes, but it really doesn't need too much special attention. You know, aside from the smaller, sharper needle hehe
Amanda sent me a beautiful bundle of 20 fat eighths, and after starting at this loveliness for ages, I decided to make a log cabin quilt for my project, and pair the beautiful Liberty prints with a black and white Heath print. (The latter is no longer widely available, but Sketch would be a wonderful substitute if you'd like to have your quilt look like mine.)
You'll notice that it's not quilted. That's because I'm a severe derp and hurt my back somehow. I say somehow because I don't know how it happened. All I know is that I look like an old lady, hobbling away. It'll be quilted once I'm feeling better, promise!
Anyway, on to the tutorial!
Liberty Log Cabin Quilt
Finished quilt size: 52.5" x 63" (Finished block size: 10.5")
Materials
20 piece fat eighth bundle of Liberty fabric
1/8 yard for centre squares
1 5/8 yards background fabric
3 1/4 yards backing fabric
1/2 yard binding fabric
Cutting
From each Liberty fat eighth, cut:
3-4 strips, 2" x 26"
(Edited to add: Liberty of London fabrics run longer than the normal quilting cotton, hence the 26" length on the fat eighth)
From the Liberty strips, cut:
30, 2" x 3.5"
30, 2" x 5"
30, 2" x 6.5"
30, 2" x 8"
30, 2" x 9.5"
30, 2" x 11"
From fabric for centres of blocks, cut:
2 strips, 2" x WOF
From the two strips, cut:
30 squares, 2" x 2"
From the background fabric, cut:
26 strips, 2" x WOF
From the 26 strips, cut:
30, 2" x 2"
30, 2" x 3.5"
30, 2" x 5"
30, 2" x 6.5"
30, 2" x 8"
30, 2" x 9.5"
Block Assembly
All 30 log cabin blocks will be put together in exactly the same way, and will each require these 13 pieces -- one centre piece, six of the sub-cut print fabrics, and six of the sub-cut background fabrics.
Start with the centre fabric and a 2" x 2" background piece. Press to one side and trim as you go along.
Sew the 2" x 3.5" background piece.
Continue with the Liberty prints, and sew the 2" x 3.5" Liberty piece.
Then sew the 2" x 5" Liberty piece, and there you have your first row of 'logs'. It should measure 5" square (unfinished).
Tips!
1. If you feel like your blocks aren't coming up square or measuring what they're supposed to, try using a scant 1/4" seam allowance, especially if you tend to press your seam to one side.
2. If you ever get lost for where you're supposed to sew the next piece on, it's the side with the two perpendicular seams facing the edge :) And in my case, I kept going in a clockwise direction.
Continue sewing on the background pieces, then the Liberty pieces to finish your second row, and it should measure 8" square (unfinished).
Continue with the third and final row, and your unfinished block should measure 11" square.
Make 30 blocks. I'm a huge fan of chain-piecing and making several blocks together, usually between four and six at a time.
Quilt Assembly
1. Arrange the blocks in six horizontal rows of five blocks each.
2. Sew the blocks together in rows, and press the seam allowances in alternating directions from row to row. Sew the rows together and press the seam allowances in the same direction or open.
I'll get this quilted soon enough... I might add more rows, so don't be surprised if the finished quilt is larger than this!
If you'd like to follow along (or go back and see what others have posted...) to see all the awesome project ideas, here are links to the other blogs!
February 24th: Kick Off! A Crafty Fox
February 25th: Astrid at Red, Red Completely Red
February 26th: Svetlana at Sotak Handmade
February 26th: Andy at A Bright Corner
February 27th: Chase at Quarter Inch Mark
March 1st: Emily at Simple Girl Simple Life
March 2nd: Ashley at Film In The Fridge
March 3rd: Lee at Freshly Pieced
March 4th: Audrie at Blue is Bleu
March 5th: Amanda at A Crafty Fox
Showing posts with label tutorial. Show all posts
March 4, 2015
February 7, 2014
Hourglass Steps Pillow Tutorial
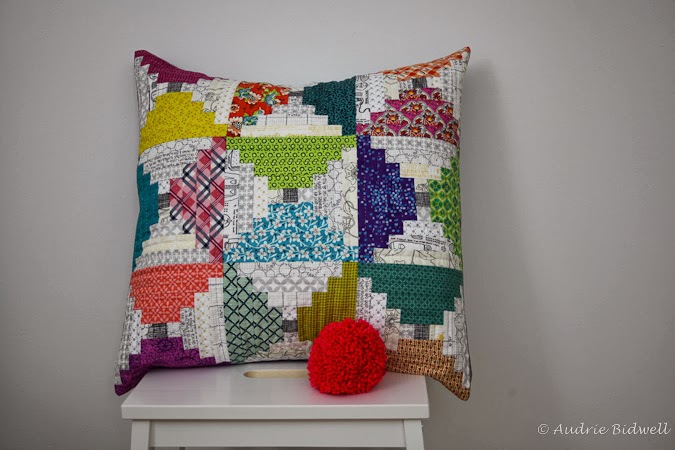
As part of Amy's Pillow Collective this week, I've dreamed up a little pillow tutorial! If you've just arrived via Amy's blog, welcome! :)
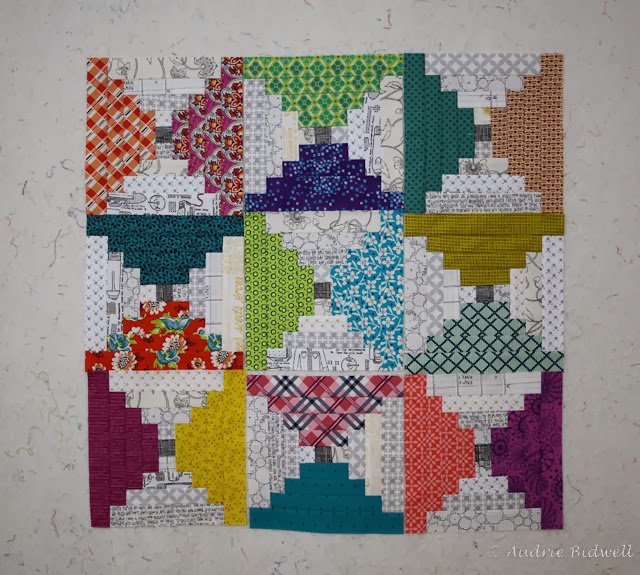
I decided to make a pillow out of my beloved courthouse steps blocks, but just a wee bit differently than I have in the past. Something with contrast is always lovely, so I decided on using colours with low volume, and arranging them to look like almost like hourglass blocks.
This is a great project if you have leftover strips and scraps from other projects. Goodness knows we have plenty of those!
What you'll need:
9 - 1.25" square centres
18 strips of colours - 1.25" x 21" long each
About a 1/4 yard worth of low volume fabrics cut into 1.25" strips
24" square backing for the pillow top
23" square piece of batting
Two pieces (20.5" x 13.5" each) of fabric for the pillow back
For each low volume section, cut:
1.25" x 1.25"
1.25" x 2.75"
1.25" x 4.25"
1.25" x 5.75"
For each colour section, cut:
1.25" x 2.75"
1.25" x 4.25"
1.25" x 5.75"
1.25" x 7.25"
Start by sewing the 1.25" square low volume pieces to the top and bottom of a centre square. Press, trim, and sew the 1.25" x 2.75" strips of colour fabric to either side.

Trim, and repeat thrice more until you get a block that measures 7.25" (unfinished).
I chose to mix up the low volume fabrics since they all have different colours to them (black, grey, yellow, cream, white), and I didn't want them to stand out too much against the coloured blocks. All mixed up, they become sort of uniform in their value. You could use one single fabric for the background, or group them like I have the coloured sections, whatever looks the best to you.
Here are my first three blocks :) Hubba hubba.
If you do it right, you'll start cultivating a wonderful mess :)
Make nine blocks and arrange them until you're happy with the layout, and sew them together. I like to snap a photo of my layout on my phone for reference since I'm usually too lazy to label the squares. Yay, technology.

Once they're sewn together, layer your backing, batting and pillow top, and baste. I used a white batting for this project since my low volume fabrics have mostly white backgrounds.
(Also, my mottled hand look like I have liver spots. Sigh. Tis' the plight of a pale girl...)
Quilt as desired. I went the hand quilting route and regretted it almost immediately because holy wow does it take forever. And my little fingers were quite sore after. But, my DVR is empty! Silver lining! I actually really enjoy hand quilting, but it's probably not something you undertake when pressed for time. Anyway, the pain goes away when you see the beautiful texture it creates. I mean, look at it!
Alright, back to the tutorial...
Trim the pillow top. The blocks finish at 6.75" square, and the pillow top should measure 20.5" square when finished.
Layer your pillow top and the two pieces for the pillow backing with right sides facing. Pin or use Wonder Clips if you prefer. I do. I love those little cute devils. Sew 1/4" all around, taking care to backstitch at the corners and where the edges of the pillow back start. There'll be plenty of pulling when you insert and remove your pillow inserts, so you want to make sure they're nice and secure.
Snip all the four little corners off about 1/8" away from where the two seams meet so you can turn the pillow out nicely. Once you've turned the pillow out, press the edges if necessary. The pillow should measure about 19.75" square, so a 20" pillow insert is probably ideal.
Optional: Then run around your house like a crazy person trying to find the right sized insert but only manage to find five that are far too small. Wake your husband up and annoy him with stupid questions, then remove one of your sofa pillow inserts and thank the heavens when it's the perfect size while avoiding the glare of the aforementioned angry husband.
And there you have it, a finished Hourglass Steps Pillow :) I hope you enjoyed that and found it useful. If you have any questions, please ask! But if the question is whether I know I'm crazy, the answer is yes, yes, and yes.
I think I'm going to need to make a quilt with this pattern because it just needs to exist. Am I right, people???
Anyway, there've been so many gorgeous pillows made by gorgeous quilters this past week, and below is a list of links to all of them. I hope you find one you like (or two, or three... I won't judge) and make it!
Amy Ellis
April Rosenthal
Lisa Calle
I decided to make a pillow out of my beloved courthouse steps blocks, but just a wee bit differently than I have in the past. Something with contrast is always lovely, so I decided on using colours with low volume, and arranging them to look like almost like hourglass blocks.
This is a great project if you have leftover strips and scraps from other projects. Goodness knows we have plenty of those!
What you'll need:
9 - 1.25" square centres
18 strips of colours - 1.25" x 21" long each
About a 1/4 yard worth of low volume fabrics cut into 1.25" strips
24" square backing for the pillow top
23" square piece of batting
Two pieces (20.5" x 13.5" each) of fabric for the pillow back
For each low volume section, cut:
1.25" x 1.25"
1.25" x 2.75"
1.25" x 4.25"
1.25" x 5.75"
For each colour section, cut:
1.25" x 2.75"
1.25" x 4.25"
1.25" x 5.75"
1.25" x 7.25"
Start by sewing the 1.25" square low volume pieces to the top and bottom of a centre square. Press, trim, and sew the 1.25" x 2.75" strips of colour fabric to either side.
There, you have your first steps.

I chose to mix up the low volume fabrics since they all have different colours to them (black, grey, yellow, cream, white), and I didn't want them to stand out too much against the coloured blocks. All mixed up, they become sort of uniform in their value. You could use one single fabric for the background, or group them like I have the coloured sections, whatever looks the best to you.
Here are my first three blocks :) Hubba hubba.
If you do it right, you'll start cultivating a wonderful mess :)
Make nine blocks and arrange them until you're happy with the layout, and sew them together. I like to snap a photo of my layout on my phone for reference since I'm usually too lazy to label the squares. Yay, technology.

Once they're sewn together, layer your backing, batting and pillow top, and baste. I used a white batting for this project since my low volume fabrics have mostly white backgrounds.
(Also, my mottled hand look like I have liver spots. Sigh. Tis' the plight of a pale girl...)
Quilt as desired. I went the hand quilting route and regretted it almost immediately because holy wow does it take forever. And my little fingers were quite sore after. But, my DVR is empty! Silver lining! I actually really enjoy hand quilting, but it's probably not something you undertake when pressed for time. Anyway, the pain goes away when you see the beautiful texture it creates. I mean, look at it!
Alright, back to the tutorial...
Trim the pillow top. The blocks finish at 6.75" square, and the pillow top should measure 20.5" square when finished.
Layer your pillow top and the two pieces for the pillow backing with right sides facing. Pin or use Wonder Clips if you prefer. I do. I love those little cute devils. Sew 1/4" all around, taking care to backstitch at the corners and where the edges of the pillow back start. There'll be plenty of pulling when you insert and remove your pillow inserts, so you want to make sure they're nice and secure.
Snip all the four little corners off about 1/8" away from where the two seams meet so you can turn the pillow out nicely. Once you've turned the pillow out, press the edges if necessary. The pillow should measure about 19.75" square, so a 20" pillow insert is probably ideal.
Optional: Then run around your house like a crazy person trying to find the right sized insert but only manage to find five that are far too small. Wake your husband up and annoy him with stupid questions, then remove one of your sofa pillow inserts and thank the heavens when it's the perfect size while avoiding the glare of the aforementioned angry husband.
And there you have it, a finished Hourglass Steps Pillow :) I hope you enjoyed that and found it useful. If you have any questions, please ask! But if the question is whether I know I'm crazy, the answer is yes, yes, and yes.
I think I'm going to need to make a quilt with this pattern because it just needs to exist. Am I right, people???
Anyway, there've been so many gorgeous pillows made by gorgeous quilters this past week, and below is a list of links to all of them. I hope you find one you like (or two, or three... I won't judge) and make it!
Amy Ellis
April Rosenthal
Lisa Calle
Christina Lane
Heather Bostic
Audrie Bidwell (You are here)
Amanda Herring
Heather Bostic
Audrie Bidwell (You are here)
Amanda Herring
Here's more details on the Pillow Collective... and there's prizes to be won!
January 10, 2010
I Got Featured!
Imagine my surprise when Vicki told me my tutorial was featured on One Pretty Thing! (It's the second to last if you go to the post.) I'm sorry if I'm being a complete dork and taking too much glee in this, but this is huge for me! :) So actually, I retract my apology :P I'm a proud, unapologetic dork.
A dork who is dancing around her living room with wild abandon.
Labels:
guest post,
tutorial
January 8, 2010
My First Tutorial!
I'd always wanted to write a tutorial. But I didn't know what I could possibly 'teach' anyone seeing as I only started sewing and quilting last year.
But Vicki of Sew Inspired asked if I'd do a guest post on her blog, and I said of course I would... without knowing what the *bleep* I'd blog about! She suggested I talk about myself or write a tutorial. I'm bored of me, so a tutorial it was.

And here it is! A scrappy patchwork sewing machine cover :) My machine needed one, I needed to write up a tutorial... it worked out great.
Thanks again to Vicki for asking me to do the guest post :) It was a lot of fun writing up the tutorial and hopefully there'll be more tutorials to come.
Labels:
guest post,
tutorial
Subscribe to:
Posts (Atom)